Is Painter’s Tape the Way to Go?
Anyone planning a do-it-yourself interior painting project quickly realizes that the devil is in the details, especially regarding prep work. You’ll need to make numerous decisions, whether picking paint colors, prepping surfaces, or figuring out how to target applications to ensure a professional-looking job. Among these decisions, one that confounds many Naples, Florida-area homeowners is whether to use painter’s tape.
On the one hand, painter’s tape represents an easy means for ensuring straight edge lines and protecting adjacent already-painted surfaces. On the other hand, you might need to spend a ridiculous amount of time taping; paint can bleed through or under the tape and sometimes peel away existing paint. What’s a Rembrandt like you supposed to do?
The professional painters at Naples-based FCI Painting will advise you that if you truly have Rembrandt-like painting skills, you can forgo the use of painter’s tape for most situations. However, should your inner Rembrandt be limited, painter’s tape could be an invaluable tool to help you produce professional-looking results for your DIY interior paint job. Let’s take a more detailed look at the pros and cons of painter’s tape.
The Pros of Using Painter’s Tape
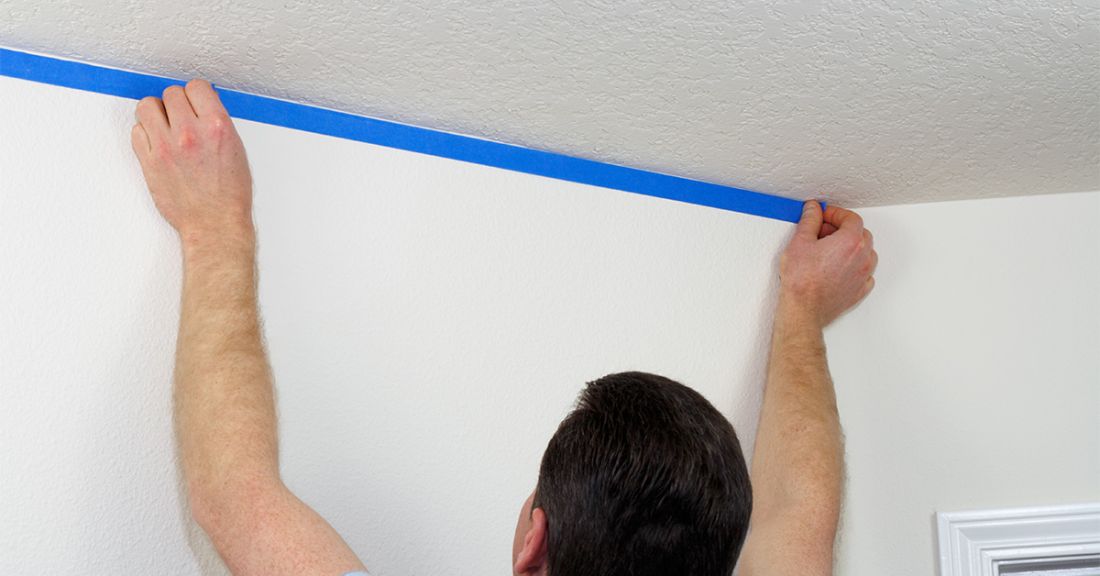
Available in an assortment of sizes and widths, painter’s tape is an inexpensive tool used to protect distinct surface areas from new paint spillovers and to create clean demarcation lines between these areas. As a straight edge, painter’s tape provides the easiest means of creating a straight border between two different surfaces, that is, as long as you unroll and affix the tape in a clean, straight line. It can be used to protect baseboards, built-in cabinetry, and trim work from wall paint or protect wall paint from different colored trim work. As a barrier against paint spillover, it allows painters to maintain their brush stroke or roller pace when applying paint near edges.
While painter’s tape is most effective as an edge barrier for baseboard and trim areas, it can also protect fixtures, such as doorknobs, light switches, and outlets. And, if you need to create straight lines for different colored accent walls or want to create special effects such as wall stripes and other designs, painter’s tape is the perfect tool. When using painter’s tape for these purposes, ensure that you properly tape your edges by plotting your lines with a tape measure, level, and penciled-in markings. As a budding Rembrandt, unless planned, you probably don’t want to end up with a horizontal line that drops four inches from one side of a wall to the other.
Last, because of its relatively gentle adhesion, painter’s tape is effective at securing plastic sheeting over larger fixed objects, such as stove hoods, appliances, or any large furniture you do not want to remove.
Drawbacks of Using Painter’s Tape
While painter’s tape can ease the painting of border areas by ensuring crisp lines without having to be careful about brush strokes, whatever time might be gained during the painting might be offset by the time needed to apply the tape. You’re not just unrolling the tape and pasting it on the surface—you need to carefully line it up along the edge with precision and then ensure that its adhesion works by firmly pressing it down.
Painter’s tape is also not foolproof. Paint can leach into inadvertent gaps between the tape and the underlying surface and sometimes bleeds through the tape itself. In fact, if you tape bumpy or uneven surfaces, the paint will inevitably find its way in. Painter’s tape can also sometimes strip existing paint from the surfaces it’s designed to protect.
Bottom line, no matter how high the tape quality and how carefully you apply it, you will inevitably end up with a few blemishes that will need to be touched up.
Practice Cutting In to Release Your Inner Rembrandt
Professional interior painters, such as the ones at Naples-based FCI Painting, rely on painter’s tape in moderation. They tend to use it to affix plastic sheeting where needed and will use it to create clean lines between multicolored effects on a distinct wall or other surfaces. However, they often do not use it to protect baseboards and trim work. Instead, professional painters create straight lines between surfaces by relying on a technique known as “cutting in.” This technique uses a high-quality angled paintbrush loaded with a bit more paint than used for normal strokes and a distinct stroke that pushes the paint in a straight, clean line. It takes practice, but once you get the hang of it, you’ll be able to paint edgework like a pro.
Consult with the Naples, FL Painting Experts at FCI Painting
We trust that our tips on painter’s tape will help you with your next DIY interior paint project and perhaps spur you to find your inner Rembrandt by learning the cutting-in technique. If not, and you dread your planned DIY paint job, consider consulting with the experts at FCI Painting. With more than 25 years of professional interior painting experience in the Naples, Florida, area, contact FCI Painting online or call us at (239) 435-1001.


